> ## Documentation Index
> Fetch the complete documentation index at: https://docs.spockoffice.com/llms.txt
> Use this file to discover all available pages before exploring further.
# Locations
> Manage office locations to configure regional holiday calendars, working days, and location-specific leave type rules for your distributed workforce.
Locations represent the physical offices, branches, or regional hubs where your employees work. Every workspace has at least one location — the default **Headquarters (HQ)** — created automatically when you install Spock.
Use locations to tailor leave management across multiple offices:
* **Regional holiday calendars** — assign a different public holiday calendar per office so employees observe the correct local holidays.
* **Different working days** — configure location-specific work weeks (e.g., Sunday–Thursday for a Dubai office, Monday–Friday for Berlin).
* **Location-specific leave type rules** — override company-wide leave type settings per location, such as different allowance days or approval requirements.
* **Timezone awareness** — set each location's timezone for accurate date handling.
* **Organizational clarity** — see how many employees are in each office and manage them from a single screen.
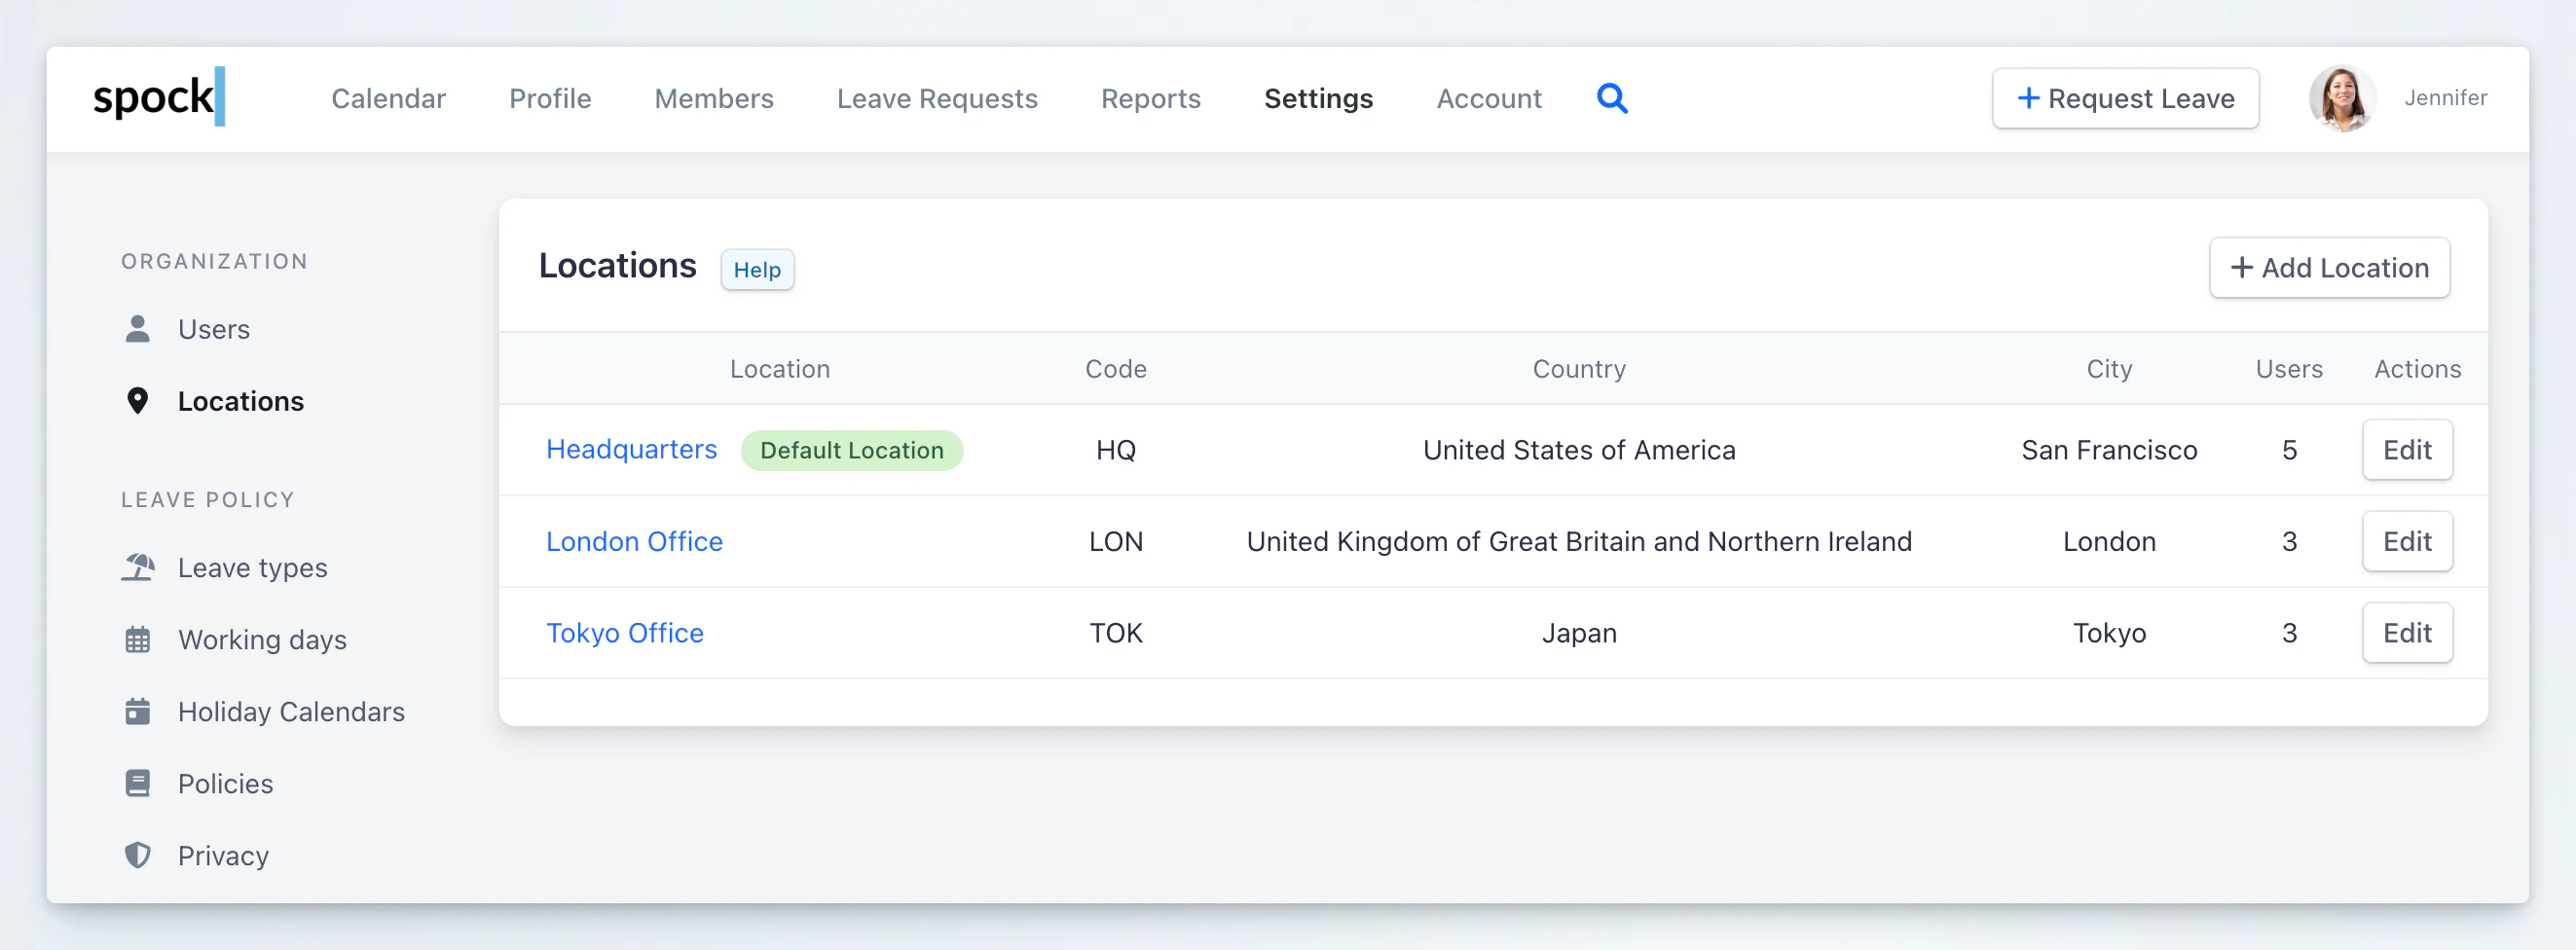 Only **workspace administrators** (users with the Service Admin role) can create, edit, and delete locations, and assign users to them.
## Creating a Location
Go to **Settings** > **Locations** in the Spock Dashboard.
Click **+ Add Location** in the top-right corner.
Complete the three sections of the location form:
**Basic Information**
| Field | Required | Description |
| ----------------- | -------- | ------------------------------------------------------------------------------------------------- |
| **Location Name** | Yes | A descriptive name (max 100 characters). Example: *New York Office*. |
| **Code** | Yes | A short identifier (max 20 characters), automatically uppercased. Must be unique. Example: *NYC*. |
| **Description** | No | Optional free-text description. |
**Address**
| Field | Required | Description |
| ------------ | -------- | ------------------------------------------------------------------------ |
| **Country** | No | Select from the dropdown list. |
| **City** | No | City name. Example: *New York*. |
| **Timezone** | No | IANA timezone. Example: *America/New\_York*. Used for date calculations. |
**Work Configuration**
| Field | Required | Description |
| -------------------- | -------- | ----------------------------------------------------------------------------------------------------------------------------------------------------------- |
| **Holiday Calendar** | No | Select which holiday calendar applies to this location. Choose **Use workspace default** to inherit the company-wide calendar, or pick a specific calendar. |
| **Working Days** | No | Check the days of the week that are working days. Defaults to Monday–Friday. Leave requested on non-working days is not deducted from balances. |
Only **workspace administrators** (users with the Service Admin role) can create, edit, and delete locations, and assign users to them.
## Creating a Location
Go to **Settings** > **Locations** in the Spock Dashboard.
Click **+ Add Location** in the top-right corner.
Complete the three sections of the location form:
**Basic Information**
| Field | Required | Description |
| ----------------- | -------- | ------------------------------------------------------------------------------------------------- |
| **Location Name** | Yes | A descriptive name (max 100 characters). Example: *New York Office*. |
| **Code** | Yes | A short identifier (max 20 characters), automatically uppercased. Must be unique. Example: *NYC*. |
| **Description** | No | Optional free-text description. |
**Address**
| Field | Required | Description |
| ------------ | -------- | ------------------------------------------------------------------------ |
| **Country** | No | Select from the dropdown list. |
| **City** | No | City name. Example: *New York*. |
| **Timezone** | No | IANA timezone. Example: *America/New\_York*. Used for date calculations. |
**Work Configuration**
| Field | Required | Description |
| -------------------- | -------- | ----------------------------------------------------------------------------------------------------------------------------------------------------------- |
| **Holiday Calendar** | No | Select which holiday calendar applies to this location. Choose **Use workspace default** to inherit the company-wide calendar, or pick a specific calendar. |
| **Working Days** | No | Check the days of the week that are working days. Defaults to Monday–Friday. Leave requested on non-working days is not deducted from balances. |
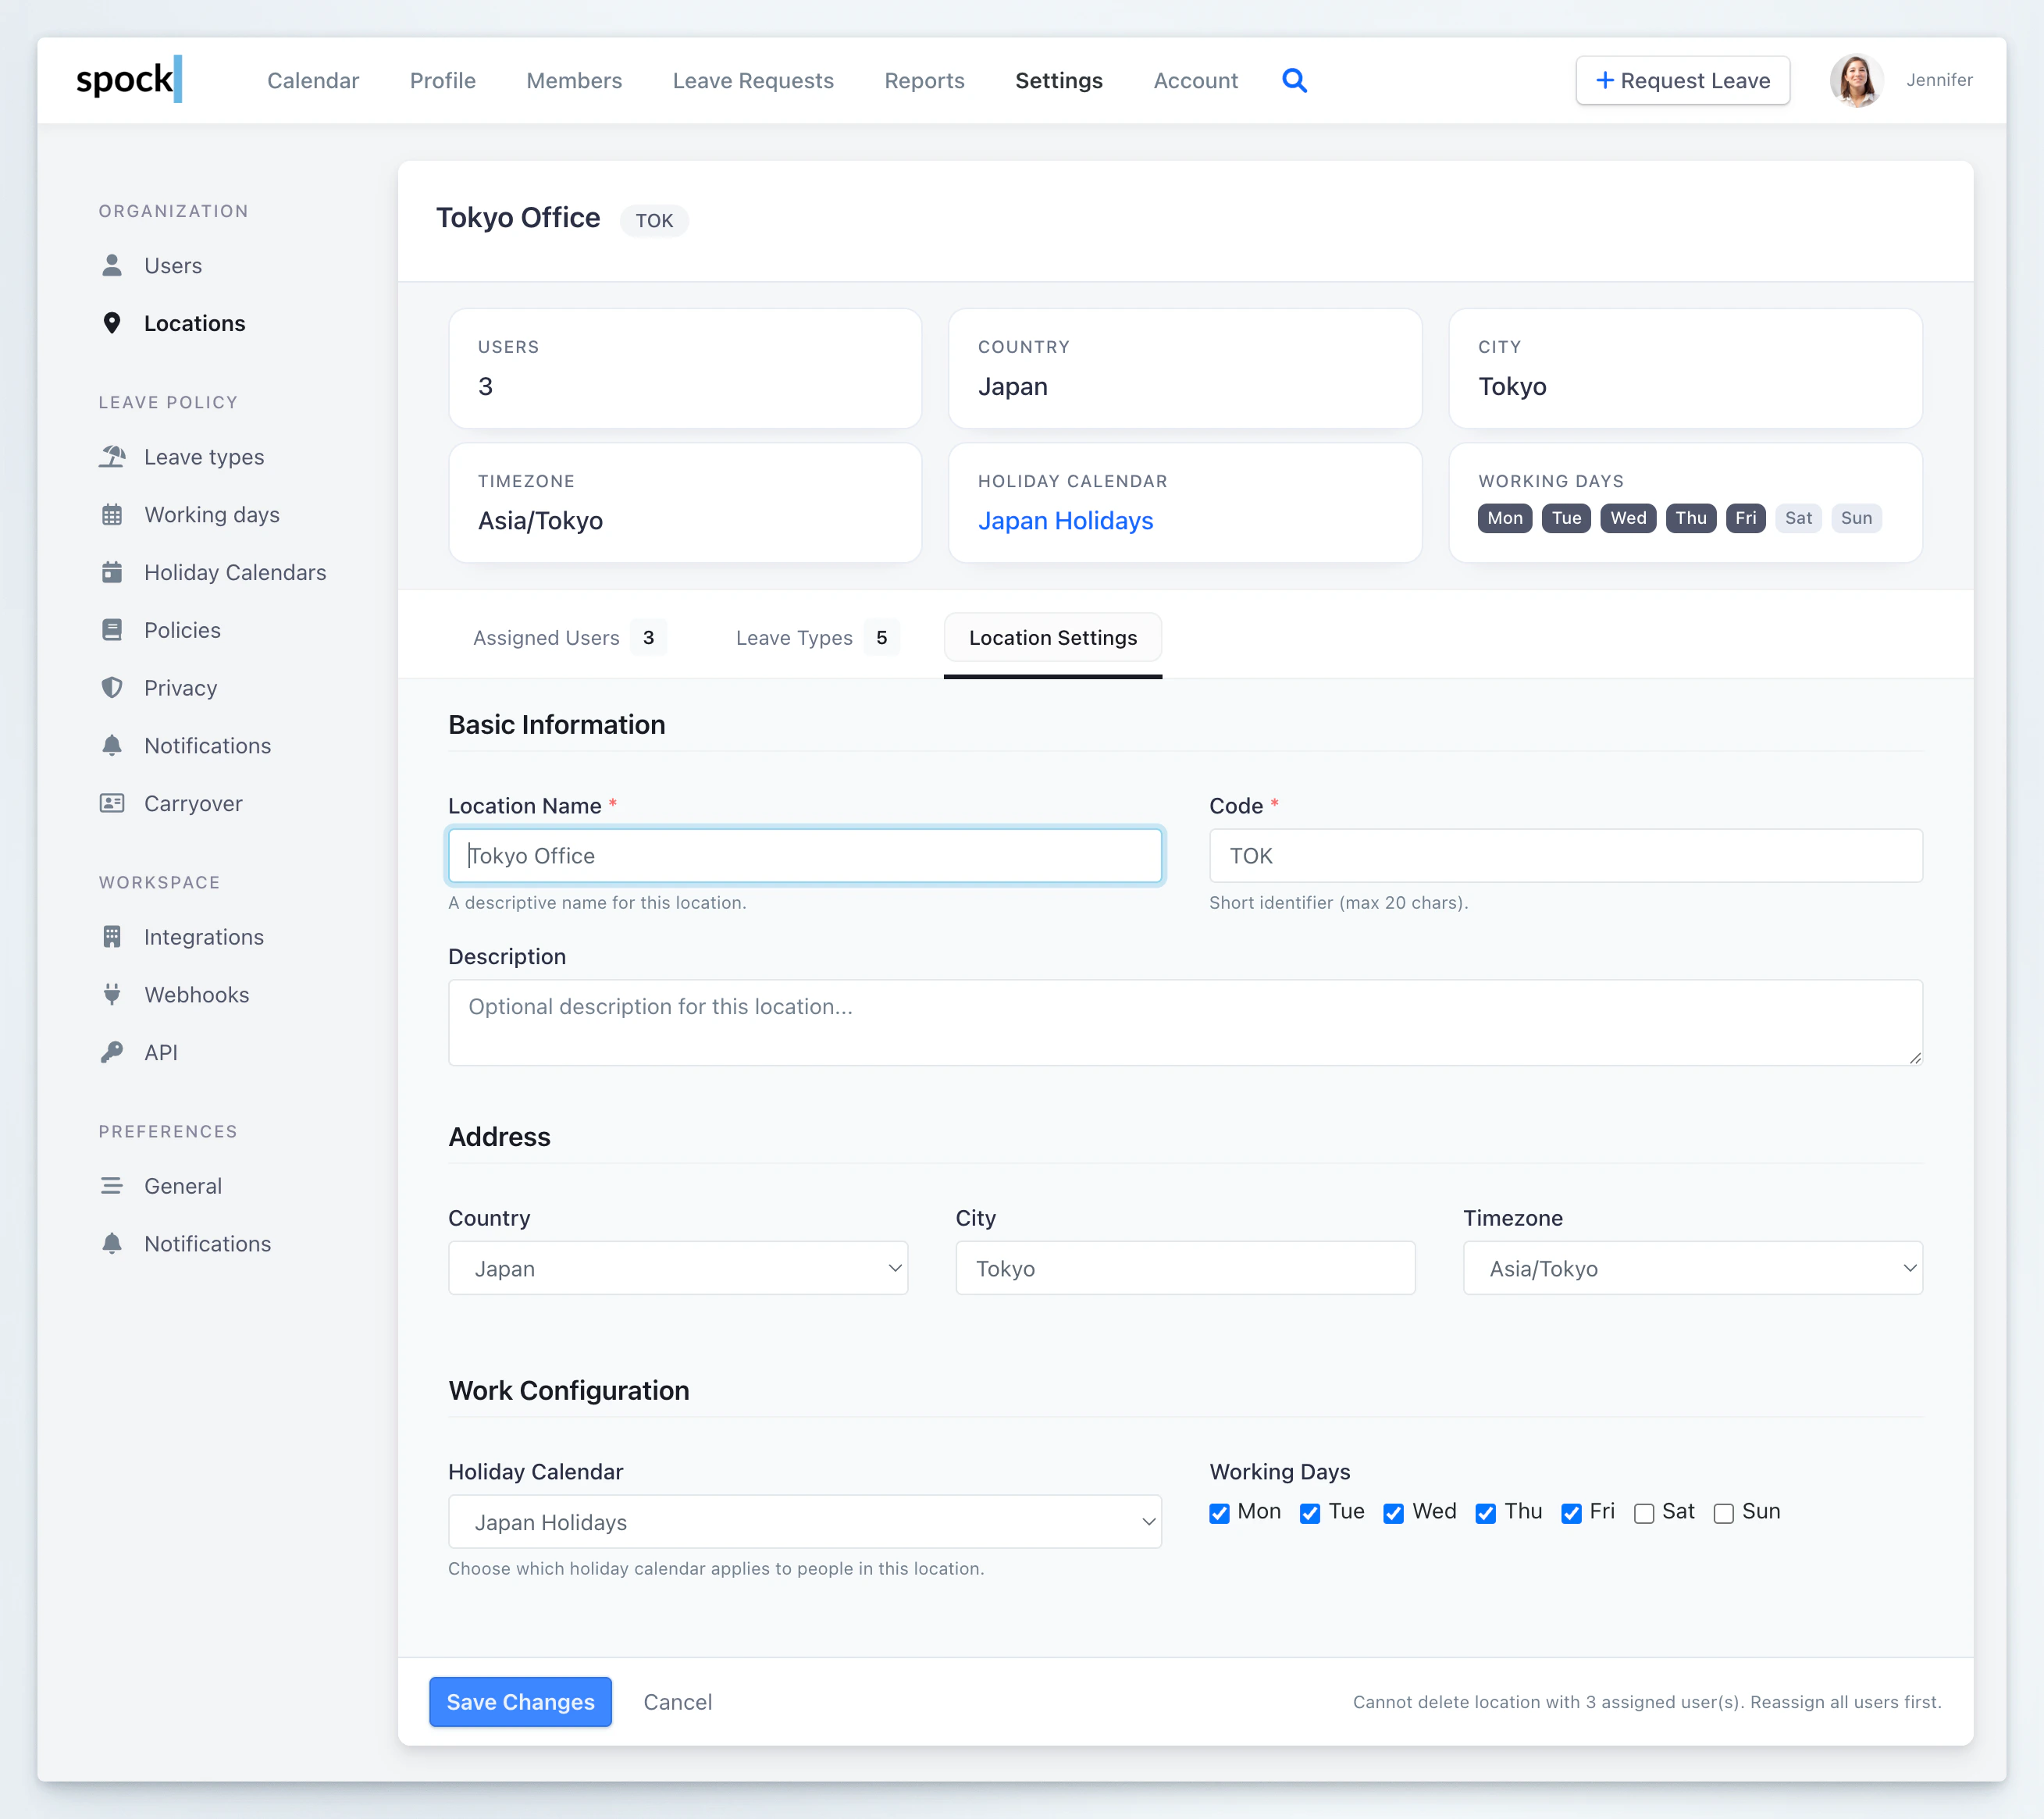 Click **Create Location** to save the new location.
The first location is automatically marked as the **default location**. All users without an explicit location assignment belong to it. The default attribute is permanent — it cannot be reassigned to a different location, and the default location cannot be deleted.
## Assigning Users to a Location
Each user in Spock belongs to exactly one location. Users not explicitly assigned belong to the default location.
Go to **Settings** > **Locations** and click on the location you want to manage.
Click the **Assigned Users** tab.
Click **Create Location** to save the new location.
The first location is automatically marked as the **default location**. All users without an explicit location assignment belong to it. The default attribute is permanent — it cannot be reassigned to a different location, and the default location cannot be deleted.
## Assigning Users to a Location
Each user in Spock belongs to exactly one location. Users not explicitly assigned belong to the default location.
Go to **Settings** > **Locations** and click on the location you want to manage.
Click the **Assigned Users** tab.
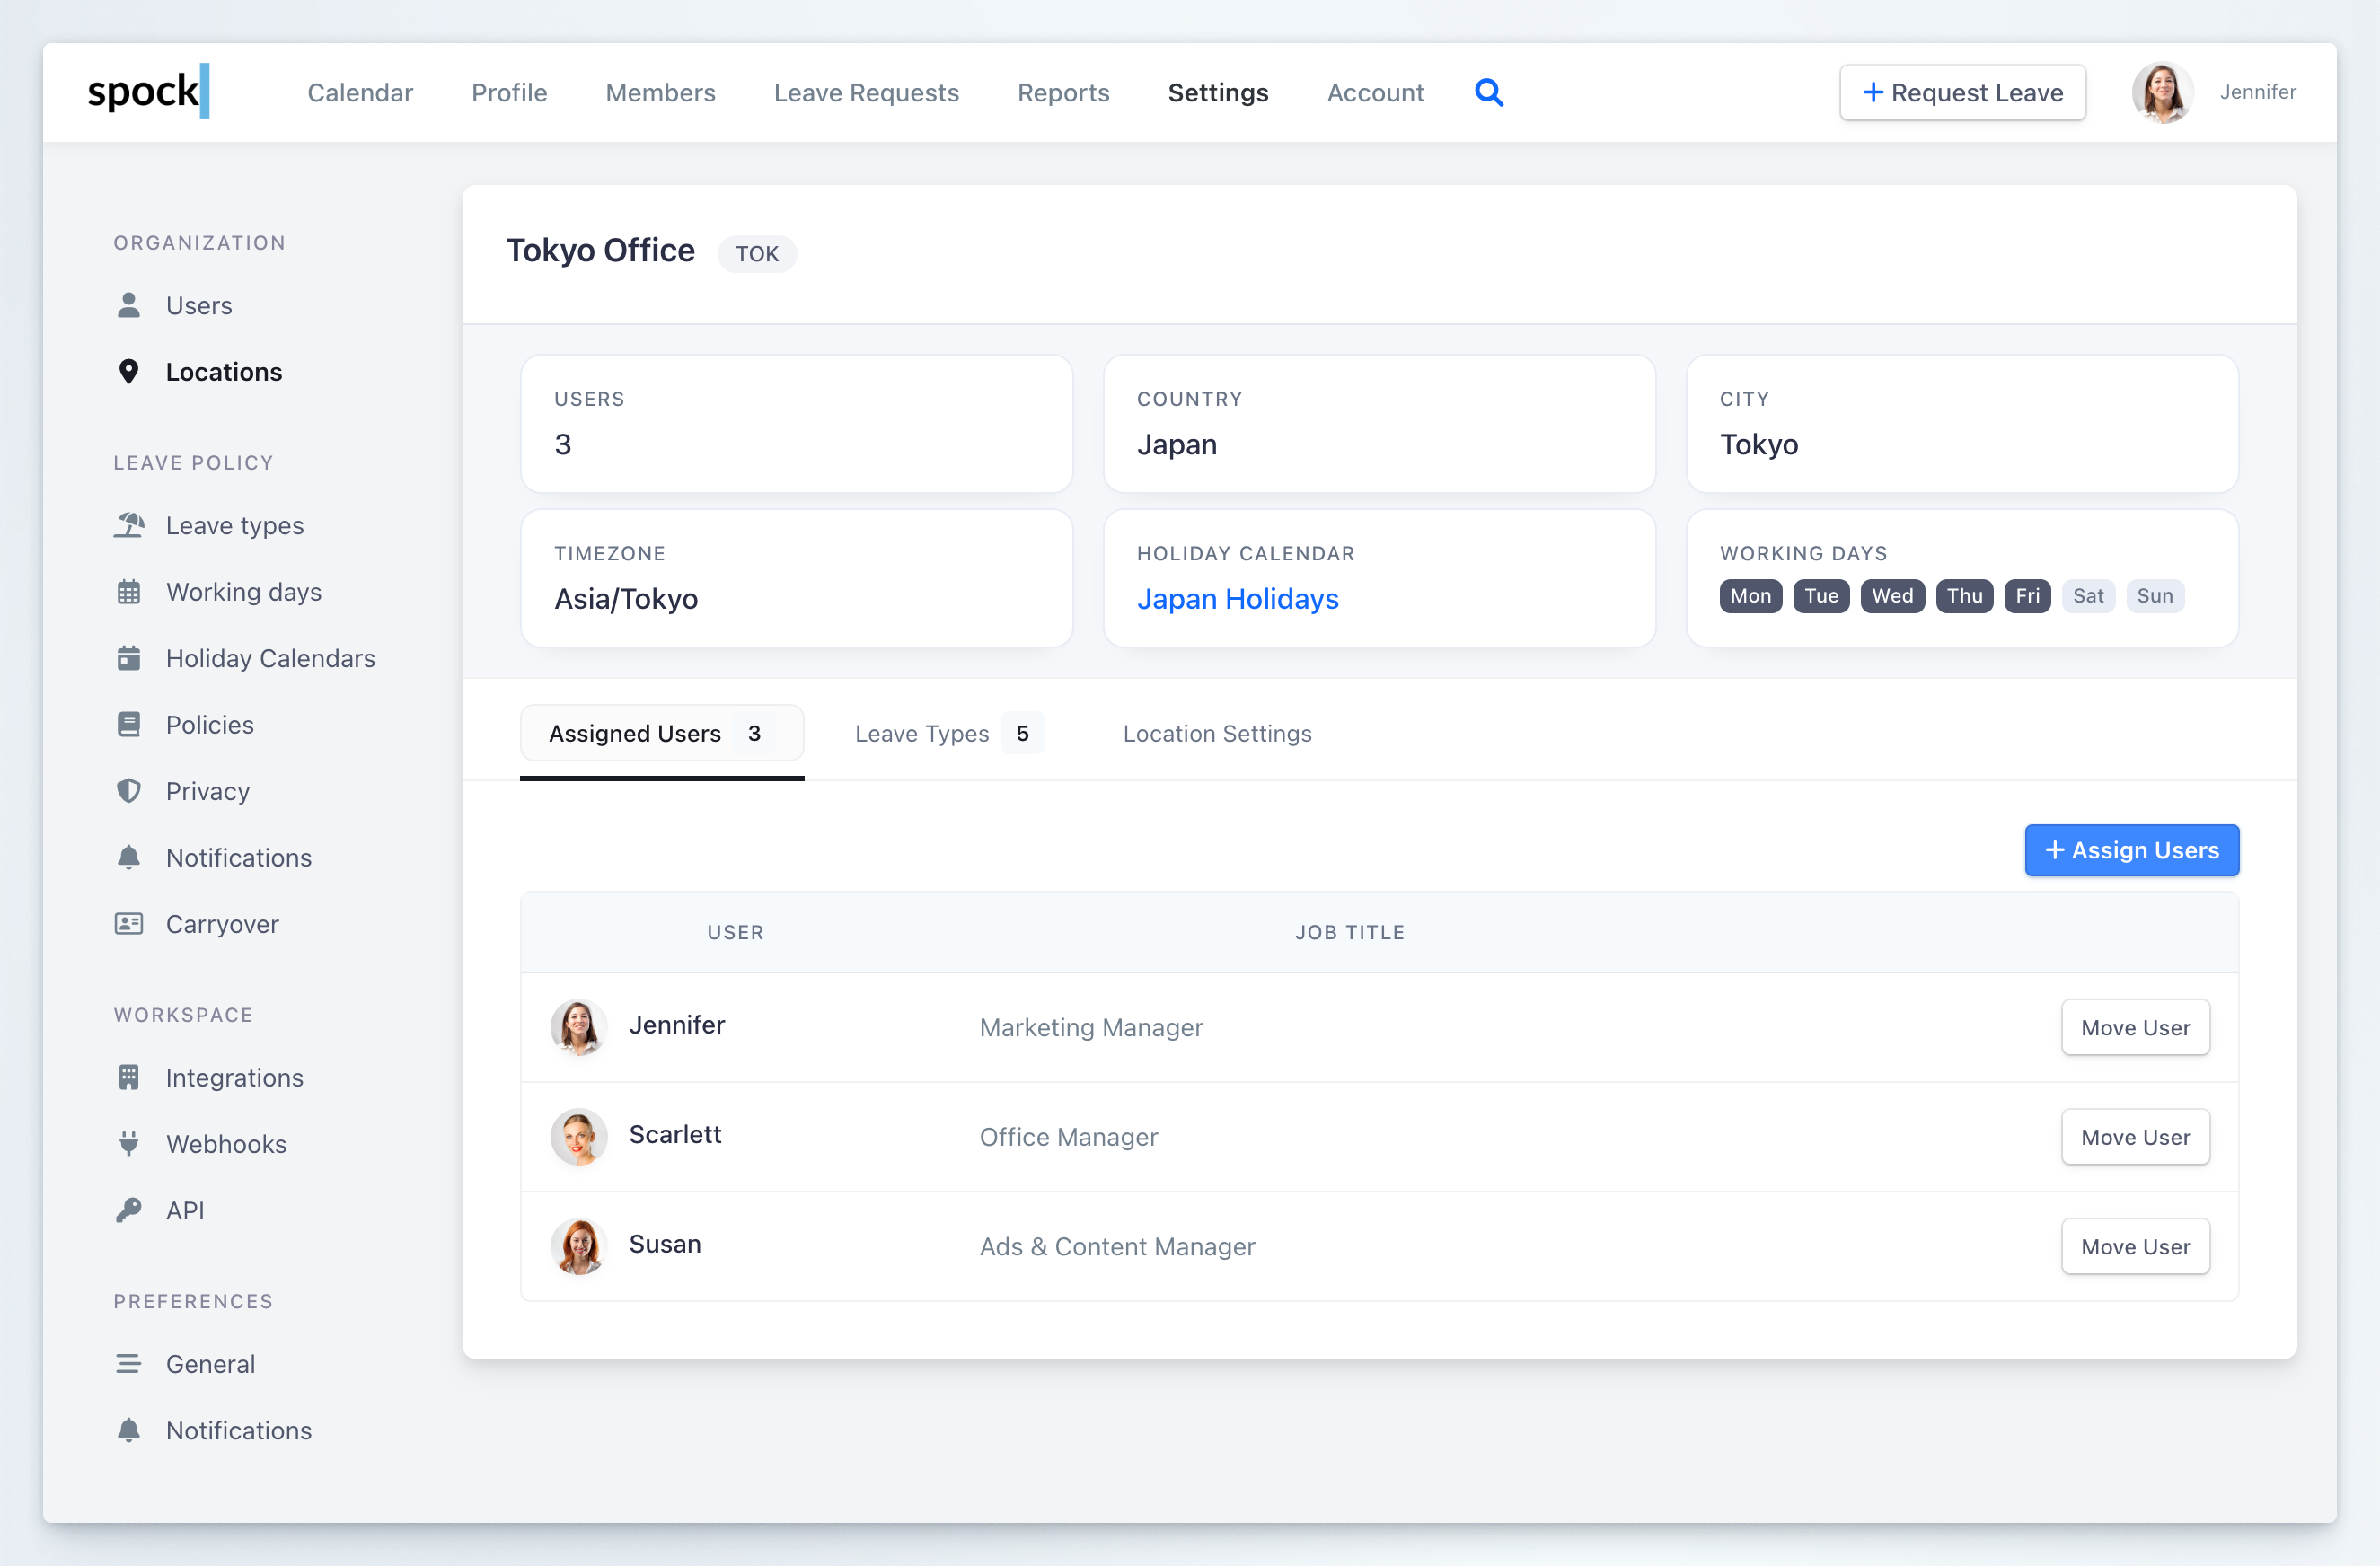 Click **+ Assign Users**. In the modal, search for users by name. The list shows available users along with their current location.
 Select one or more users using the checkboxes, then click **Assign Selected**.
### Moving a User to Another Location
To move a user who is already assigned:
1. On the **Assigned Users** tab, find the user you want to move.
2. Click **Move User** next to their name.
3. In the modal, select the target location from the dropdown.
4. Click **Move User**.
Spock recalculates allowances automatically only for recently created users (less than 14 days old) being moved from the default location. For all other users, Spock shows a notification that allowances may need manual review — this avoids accidentally overwriting manual adjustments such as seniority bonuses.
When allowances are auto-recalculated, manual adjustments are preserved. Spock calculates the difference (delta) between the manual adjustment and the standard allowance, and applies the same delta to the new location's allowance.
### Inactive and Deleted Users
The **Assigned Users** tab shows only active users by default. If a location has inactive or deleted users, use the **Show inactive/deleted users** toggle to reveal them. Inactive and deleted users remain assigned to their location, which is relevant when [deleting a location](#deleting-a-location).
## Leave Type Overrides
By default, every location inherits the company-wide leave type settings configured in **Settings** > **Leave Types**. Location leave type overrides let you customize specific settings for a particular location without changing the company-wide defaults.
### What You Can Override
For each leave type at a location, you can override the following:
| Setting | Description |
| --------------------------- | ------------------------------------------------------------------------------------------------------------ |
| **Active in this location** | Toggle whether this leave type is available for users in this location. |
| **Approval Required** | Override whether leave requests of this type require manager approval. |
| **Yearly Allowance** | Set a different annual allowance (in days). Only available if the leave type has allowance tracking enabled. |
| **Allow Negative Balance** | Override whether employees can request leave that exceeds their remaining balance. |
| **Monthly Limit** | Set a different maximum number of days per month for this leave type. |
### How Overrides Work
Overrides use a simple inheritance model:
* **Not overridden (default):** The location uses the company-wide setting. Unchecked fields show the label *(default)* and display the company-wide value for reference.
* **Overridden:** The location uses the value you set. An override indicator appears next to the field in the Leave Types table.
If you later change the company-wide setting, locations that have **not** overridden that field automatically pick up the new value. Locations with an override keep their custom value.
### Setting Up a Leave Type Override
Go to **Settings** > **Locations** and click on the location you want to configure.
Click the **Leave Types** tab. You will see a table listing all company leave types with their effective values for this location. Fields with overrides are marked with an override indicator.
Select one or more users using the checkboxes, then click **Assign Selected**.
### Moving a User to Another Location
To move a user who is already assigned:
1. On the **Assigned Users** tab, find the user you want to move.
2. Click **Move User** next to their name.
3. In the modal, select the target location from the dropdown.
4. Click **Move User**.
Spock recalculates allowances automatically only for recently created users (less than 14 days old) being moved from the default location. For all other users, Spock shows a notification that allowances may need manual review — this avoids accidentally overwriting manual adjustments such as seniority bonuses.
When allowances are auto-recalculated, manual adjustments are preserved. Spock calculates the difference (delta) between the manual adjustment and the standard allowance, and applies the same delta to the new location's allowance.
### Inactive and Deleted Users
The **Assigned Users** tab shows only active users by default. If a location has inactive or deleted users, use the **Show inactive/deleted users** toggle to reveal them. Inactive and deleted users remain assigned to their location, which is relevant when [deleting a location](#deleting-a-location).
## Leave Type Overrides
By default, every location inherits the company-wide leave type settings configured in **Settings** > **Leave Types**. Location leave type overrides let you customize specific settings for a particular location without changing the company-wide defaults.
### What You Can Override
For each leave type at a location, you can override the following:
| Setting | Description |
| --------------------------- | ------------------------------------------------------------------------------------------------------------ |
| **Active in this location** | Toggle whether this leave type is available for users in this location. |
| **Approval Required** | Override whether leave requests of this type require manager approval. |
| **Yearly Allowance** | Set a different annual allowance (in days). Only available if the leave type has allowance tracking enabled. |
| **Allow Negative Balance** | Override whether employees can request leave that exceeds their remaining balance. |
| **Monthly Limit** | Set a different maximum number of days per month for this leave type. |
### How Overrides Work
Overrides use a simple inheritance model:
* **Not overridden (default):** The location uses the company-wide setting. Unchecked fields show the label *(default)* and display the company-wide value for reference.
* **Overridden:** The location uses the value you set. An override indicator appears next to the field in the Leave Types table.
If you later change the company-wide setting, locations that have **not** overridden that field automatically pick up the new value. Locations with an override keep their custom value.
### Setting Up a Leave Type Override
Go to **Settings** > **Locations** and click on the location you want to configure.
Click the **Leave Types** tab. You will see a table listing all company leave types with their effective values for this location. Fields with overrides are marked with an override indicator.
 Click the **Edit** button on the leave type row you want to configure.
In the configuration modal:
* Use the **Active in this location** toggle to enable or disable the leave type.
* Check the **Override** checkbox next to any field you want to customize.
* Enter the location-specific value.
* The **Company default** label below each field shows the current company-wide value for reference.
Click the **Edit** button on the leave type row you want to configure.
In the configuration modal:
* Use the **Active in this location** toggle to enable or disable the leave type.
* Check the **Override** checkbox next to any field you want to customize.
* Enter the location-specific value.
* The **Company default** label below each field shows the current company-wide value for reference.
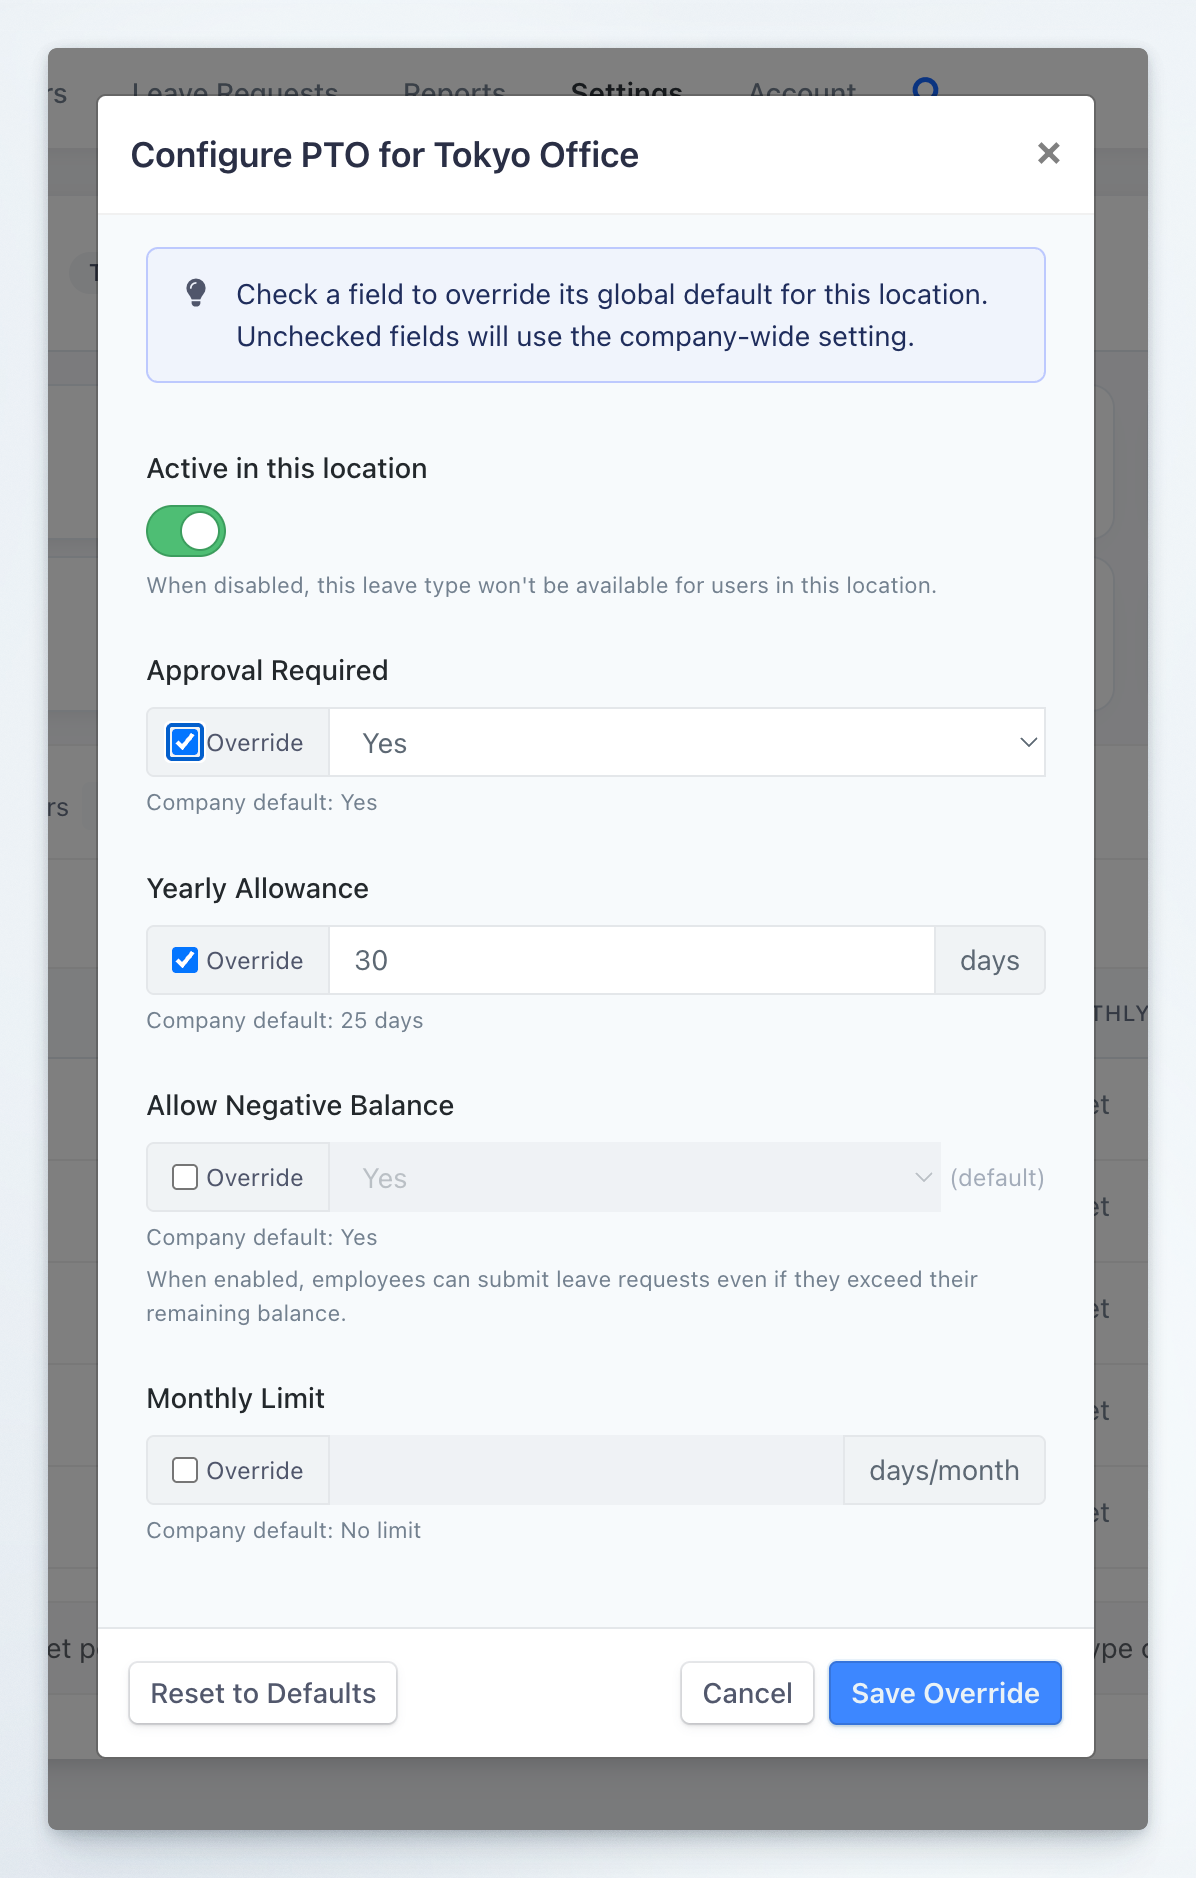 Click **Save Override** to apply your changes.
### Resetting Overrides to Defaults
To remove all overrides for a leave type and revert to company-wide settings:
1. Open the leave type configuration modal (click **Edit** on the leave type row).
2. Click **Reset to Defaults** (button at the bottom-left of the modal).
3. Confirm the action in the dialog.
This clears all overrides and the leave type will fully inherit company-wide settings.
## Deleting a Location
A location can only be deleted when:
1. **It is not the default location.** The default location cannot be deleted.
2. **No active users are assigned to it.** You must reassign or move all active users to other locations first.
Go to **Settings** > **Locations** and click on the location you want to delete.
Click the **Location Settings** tab.
Click **Delete Location** in the bottom-right corner.
* If the location has no users, click **Delete Location** to confirm.
* If the location has only inactive/deleted users, click **Move inactive/deleted users to default and delete**. This moves all remaining users to the default location and deletes the location in one step.
Deletion cannot be undone. All leave type overrides configured for the location are automatically removed. Users who were moved to another location before deletion keep their current allowances — no automatic recalculation occurs.
The **Delete Location** button is hidden when deletion is not possible. Instead, an explanation message is shown — either *"Cannot delete default location"* or *"Location has assigned users"*. Always check for inactive users before attempting to delete. Use the **Show inactive/deleted users** toggle on the Assigned Users tab to see which users are still assigned.
## Related Topics
Configure company-wide leave type settings that locations inherit by default.
Set up holiday calendars that can be assigned to specific locations.
Configure the default working week for your organization.
Manage user roles and permissions across the organization.
Click **Save Override** to apply your changes.
### Resetting Overrides to Defaults
To remove all overrides for a leave type and revert to company-wide settings:
1. Open the leave type configuration modal (click **Edit** on the leave type row).
2. Click **Reset to Defaults** (button at the bottom-left of the modal).
3. Confirm the action in the dialog.
This clears all overrides and the leave type will fully inherit company-wide settings.
## Deleting a Location
A location can only be deleted when:
1. **It is not the default location.** The default location cannot be deleted.
2. **No active users are assigned to it.** You must reassign or move all active users to other locations first.
Go to **Settings** > **Locations** and click on the location you want to delete.
Click the **Location Settings** tab.
Click **Delete Location** in the bottom-right corner.
* If the location has no users, click **Delete Location** to confirm.
* If the location has only inactive/deleted users, click **Move inactive/deleted users to default and delete**. This moves all remaining users to the default location and deletes the location in one step.
Deletion cannot be undone. All leave type overrides configured for the location are automatically removed. Users who were moved to another location before deletion keep their current allowances — no automatic recalculation occurs.
The **Delete Location** button is hidden when deletion is not possible. Instead, an explanation message is shown — either *"Cannot delete default location"* or *"Location has assigned users"*. Always check for inactive users before attempting to delete. Use the **Show inactive/deleted users** toggle on the Assigned Users tab to see which users are still assigned.
## Related Topics
Configure company-wide leave type settings that locations inherit by default.
Set up holiday calendars that can be assigned to specific locations.
Configure the default working week for your organization.
Manage user roles and permissions across the organization.